
Key Takeaways
- Wood rot is caused by fungi that thrive in damp, poorly ventilated conditions, especially when wood moisture levels remain above 20 percent.
- Early warning signs include peeling paint, dark discoloration, soft or spongy wood, musty odors, and areas that stay damp long after rain.
- The most important step is fixing the source of moisture, such as roof leaks, clogged gutters, failed caulk, or poor drainage.
- Minor damage can often be repaired by removing decayed wood, applying a hardener, filling the cavity with epoxy, and sealing the surface with primer and paint.
- Common trouble spots include window sills, door frames, decks, fascia boards, soffits, and areas around plumbing fixtures.
- Regular inspections, prompt maintenance, and protective coatings are the best ways to prevent decay from returning.
- Widespread or structural damage should be evaluated by a professional to ensure the home remains safe and sound.
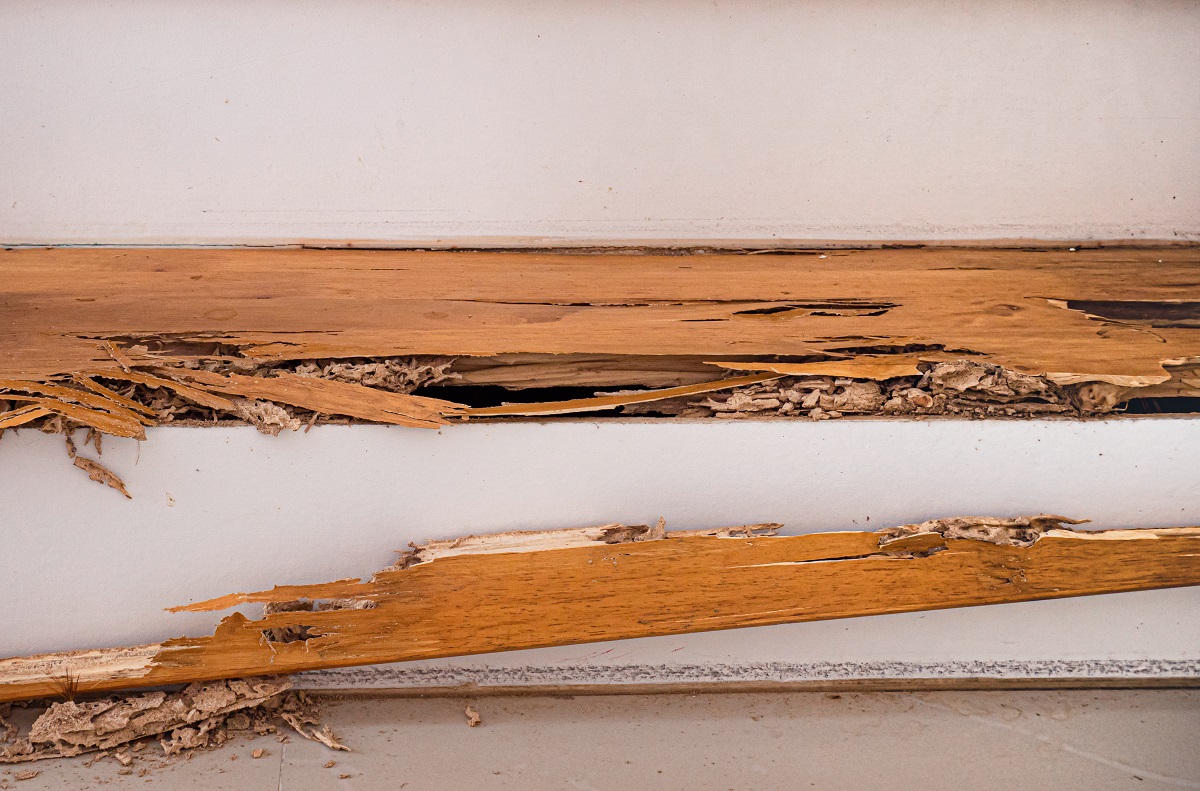
Wood rot is one of those home problems that often starts quietly. A window sill feels a little soft. Paint begins bubbling. A deck board looks darker than the surrounding wood. These small warning signs may seem harmless, but they usually indicate that moisture has already started breaking down the wood fibers.
The good news is that catching the issue early gives you a strong chance to stop the damage before it spreads. Whether the affected wood is on your siding, deck, porch, trim, or window frames, acting quickly can save you from expensive repairs and preserve the structural integrity of your home.
This guide explains exactly how to identify the first signs of wood rot, determine how severe the problem is, repair damaged areas, and prevent future moisture issues.
What Is Wood Rot and Why Does It Happen?
Wood rot is a form of decay caused by fungi that thrive in moist environments. When wood remains damp for long periods, fungal spores begin feeding on the cellulose and lignin that give wood its strength.
Rot typically develops when three conditions are present:
- Moisture levels above 20%
- Moderate temperatures
- Poor ventilation
Once these conditions persist, the wood begins to soften, discolor, and lose structural integrity.
Common Causes of Excess Moisture
Many household issues can create the ideal conditions for rot, including:
- Leaking roofs
- Clogged gutters
- Cracked caulking around windows
- Poor drainage around the foundation
- Plumbing leaks
- Condensation in crawl spaces
- Improperly sealed decks and fences
Eliminating the source of moisture is the most important step in stopping wood rot.
Where Does Wood Rot Commonly Develop?
Rot tends to appear where water collects or where ventilation is poor.
Exterior Areas
- Window sills
- Door frames
- Deck boards
- Porch columns
- Roof fascia
- Soffits
- Siding trim
- Fence posts
Interior Areas
- Bathrooms
- Kitchens
- Laundry rooms
- Basements
- Crawl spaces
- Around plumbing fixtures
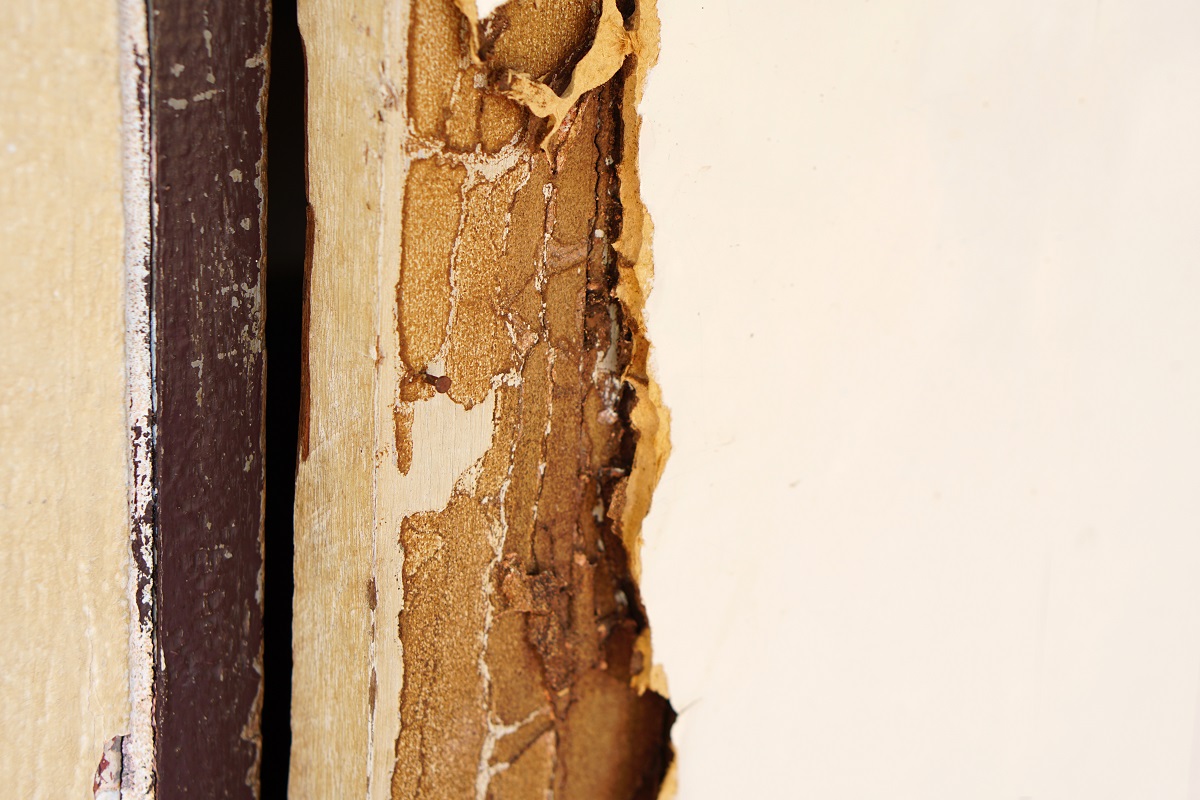
How Can You Confirm That It Is Really Rot?
Not every damaged piece of wood is actually rotten. Exterior trim and decking can become discolored from sun exposure, stained by dirt, or weakened by insect activity. In some cases, paint may peel simply because the surface was not prepared properly. Before you begin repairing or replacing wood, it is important to confirm that fungal decay is the real cause of the problem.
Fortunately, there are several simple ways to tell whether wood rot is present.
Simple Testing Methods
Use the following steps to determine whether the wood has started to decay.
1. Press a Screwdriver into the Wood
One of the easiest and most effective tests is to probe the area with a screwdriver or awl.
Gently push the tip into any suspicious section.
What to look for:
- The tool sinks in easily with little resistance
- The surface feels soft or spongy
- Wood fibers crumble or flake apart
- The area compresses under pressure
Healthy wood should feel dense and firm. If the screwdriver punctures the wood with minimal effort, rot is likely present.
2. Check for Softness and Crumbling
Use your fingers to press along edges, corners, and joints where moisture tends to collect.
Signs of decay include:
- A mushy texture
- Wood that flakes away when touched
- Splintering or crumbling fibers
- Edges that no longer hold their shape
Wood rot often starts in corners and end grain because these areas absorb water more easily than flat surfaces.
3. Look for Color Changes Beneath Paint
Peeling paint does not always mean rot, but it is often a warning sign. If you scrape away loose paint and notice darkened or stained wood underneath, moisture may have been trapped for an extended period.
Common discoloration patterns include:
- Dark brown or black patches
- Gray areas that remain damp
- Yellow or brown water stains
- Uneven coloring around joints
When discoloration is combined with softness, there is a strong chance that decay has already started.
4. Measure Moisture with a Moisture Meter
A moisture meter provides one of the most reliable ways to assess whether wood is at risk.
General guidelines:
- Below 15%: Typically dry and stable
- 15% to 20%: Elevated moisture that should be monitored
- Above 20%: Conditions are highly favorable for wood rot
If a section has high moisture readings and shows signs of softening, fungal decay is very likely.
5. Inspect Surrounding Materials
Rot rarely develops in isolation. Check nearby surfaces for evidence of water intrusion or prolonged dampness.
Inspect for:
- Mold or mildew
- Rusted nails or screws
- Damp insulation
- Stained drywall
- Loose caulk
- Warped trim
These related symptoms help confirm that moisture has been present long enough to support fungal growth.
How Wood Rot Differs from Other Types of Damage
Some conditions can look similar to wood rot but require different repairs.
1. Weathered Wood
Sun and rain can turn wood gray and rough without affecting its structural strength. If the surface is dry and solid, it may only need sanding and refinishing.
2. Insect Damage
Termites and carpenter ants can hollow out wood, but the material may still feel dry rather than soft and spongy.
3. Surface Mold
Mold can grow on damp wood without causing structural decay. Unlike rot, mold usually affects the surface and does not significantly weaken the material.
When You Should Remove a Small Test Section
If you are unsure whether the damage is superficial, carefully remove a thin layer of paint or a small portion of the affected wood.
If the material beneath is:
- Firm and dry, the damage may be cosmetic
- Dark, soft, and crumbly, rot is present
- Wet but structurally sound, you may have caught the problem early
This quick test can help you determine whether a minor repair will be enough or if replacement is necessary.
Should You Repair or Replace the Wood?
The best approach depends on how deeply the rot has spread.
Repair Minor Damage
Repair is often sufficient when:
- The affected area is small
- Most of the wood remains solid
- Structural strength is intact
- Moisture has been corrected
Replace Severely Damaged Components
Replacement is the better choice when:
- More than 20–30% of the board is compromised
- Structural members are weakened
- Rot extends into multiple connected components
- The wood crumbles extensively
If you discover widespread decay, it may be time to prepare for home remodeling to address larger structural and moisture-related issues.
Step 1: Fix the Moisture Source First
Repairing rotten wood without solving the underlying water problem is like repainting over a leak. The repair may look good for a short time, but the decay will return as soon as the wood gets wet again. Before you remove damaged wood or apply any fillers, identify exactly where the moisture is coming from and correct it permanently.
Common Moisture Fixes
Depending on the source of the problem, you may need to:
- Repair roof leaks
- Clean and realign gutters and downspouts
- Replace cracked or missing caulking
- Improve drainage around the foundation
- Repair plumbing leaks
- Install a vapor barrier in crawl spaces
- Increase attic or crawl space ventilation
- Adjust sprinklers that spray directly onto siding
In some cases, there may be more than one source of moisture. For example, a window sill may be affected by both failed caulk and condensation caused by poor insulation.
Let the Wood Dry Completely
Once the source of moisture is fixed, allow the affected area to dry thoroughly before moving to the next step. Depending on the weather and humidity, this may take anywhere from a day to several days.
You can speed up the drying process by:
- Using fans
- Running a dehumidifier
- Opening nearby windows
- Removing wet insulation or debris
If you begin repairs while the wood is still damp, fillers and coatings may not bond properly.
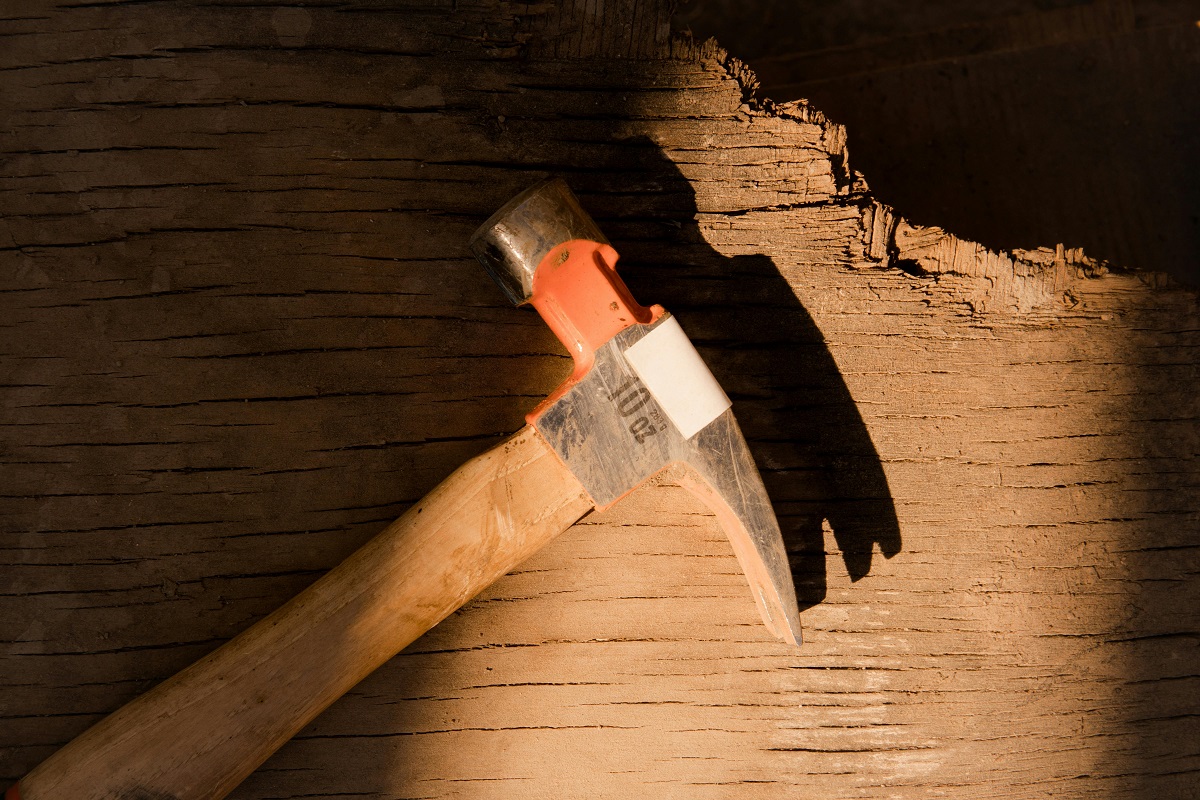
Step 2: Remove Soft and Decayed Wood
The next step is to remove all weakened material until only sound wood remains. This is one of the most important parts of the process, because any remaining decayed fibers can continue to deteriorate beneath the repair.
Tools You Can Use
Depending on the size and shape of the damaged area, helpful tools include:
- Chisels
- Putty knives
- Utility knives
- Rotary tools
- Wire brushes
- Small pry bars
Work carefully so you remove only the damaged sections.
Important Guidelines
Keep these best practices in mind:
- Remove every soft or crumbly section
- Continue until the wood feels hard and solid
- Scrape out loose dust and fibers
- Vacuum the cavity thoroughly
- Let the area dry again if needed
The resulting cavity may appear larger than expected, but this is normal. It is better to expose all the damage than to trap decayed wood beneath the repair.
Step 3: Apply a Wood Hardener
After removing the decayed fibers, the remaining wood may still be porous and somewhat weakened. A wood hardener penetrates these fibers and strengthens them, creating a stable foundation for filler.
How Wood Hardener Works
Most hardeners are thin liquid resins that soak deep into soft wood and cure into a rigid material. This helps restore some structural strength and improves adhesion for epoxy and filler products.
How to Use It
Follow these general steps:
- Brush or pour the hardener onto the exposed wood.
- Allow it to soak into all porous areas.
- Apply a second coat if the wood absorbs the first quickly.
- Let it cure according to the manufacturer’s instructions.
Some products cure in a few hours, while others may require overnight drying.
Why This Step Matters
Skipping the hardener can lead to weak repairs that crack or separate over time. When used correctly, it reinforces the remaining wood and extends the life of the restoration.
Step 4: Fill the Damaged Area
Once the hardener has cured, rebuild the missing portion with an exterior-grade epoxy or wood filler. This restores the original shape and seals the area against moisture.
Choosing the Right Filler
For exterior repairs, two-part epoxy products are usually the best option because they:
- Bond strongly to wood
- Resist moisture
- Maintain their shape
- Last for many years
Standard interior wood fillers are often not durable enough for outdoor use.
Best Practices
For a strong and long-lasting repair:
- Mix the product exactly as directed
- Press it firmly into the cavity
- Slightly overfill the area
- Shape it while it is still workable
- Allow complete curing before sanding
Large repairs may require multiple layers.
Step 5: Sand and Shape the Repair
After the filler cures, sand it until it blends smoothly with the surrounding wood. This step is essential for both appearance and durability.
Tools That Help
You may find these tools useful:
- Sanding blocks
- Random orbital sanders
- Detail files
- Putty knives for fine shaping
Start with a medium-grit sandpaper and finish with a finer grit for a smooth surface.
Why Proper Shaping Matters
A well-shaped repair:
- Matches the original profile
- Prevents water from pooling
- Creates a seamless appearance
- Improves primer and paint adhesion
Take your time to recreate edges, corners, and contours accurately.
Step 6: Prime and Paint the Surface
The final step is sealing the repaired area so moisture cannot penetrate again. Even the best filler will fail if left exposed to water and sunlight.
Recommended Coatings
Use high-quality products designed for exterior conditions, such as:
- Exterior bonding primer
- Acrylic latex paint
- Marine-grade sealers for harsh climates
- Paintable caulk for joints and seams
Application Tips
For the best protection:
- Prime all repaired surfaces
- Apply at least two coats of paint
- Seal gaps around joints
- Cover all exposed edges and end grain
Once finished, the repair should look natural and be protected against future moisture damage.
What if the Damage Is on a Deck?
Decks are especially prone to wood rot because they are constantly exposed to rain, sunlight, and foot traffic. Leaves and debris can trap moisture, while cracked finishes allow water to penetrate the wood.
Deck Repair Tips
Inspect and repair the following areas carefully:
- Surface boards
- Stair treads
- Rail posts
- Joists
- Ledger boards attached to the house
Cosmetic boards can often be replaced individually, but structural elements such as joists and ledger boards should be evaluated closely for safety.
Preventing Deck Rot
To extend the life of your deck:
- Sweep away leaves and dirt regularly
- Wash the surface annually
- Seal the wood every two to three years
- Keep drainage clear beneath the deck
- Avoid placing planters directly on the boards
Routine maintenance helps prevent moisture from lingering long enough to cause decay.
How Do You Handle Rotten Window Sills?
Window sills and trim are among the most common locations for wood rot because they are exposed to rain, condensation, and temperature changes.
Causes Around Windows
Rot around windows often develops because of:
- Failed caulk
- Condensation buildup
- Poor flashing
- Cracked or peeling paint
- Improperly sloped sills
Repair Process
The repair method is similar to other wood surfaces:
- Remove all decayed wood.
- Apply a wood hardener.
- Fill the cavity with epoxy.
- Sand the repair smooth.
- Prime and paint.
- Re-caulk all seams.
Inspect window trim at least twice a year, especially after rainy seasons.
What About Door Frames?
Door frames are highly vulnerable at the bottom corners, where rainwater, irrigation, and everyday wear combine.
Common Moisture Sources
Typical causes include:
- Splash-back from rain
- Worn weatherstripping
- Poor thresholds
- Failed sealant
- Water from sprinklers
Repair Tips
Minor rot can often be repaired with epoxy, but extensive damage to the lower jambs may require cutting out and replacing part of the frame.
After the repair, make sure the threshold, weatherstripping, and caulk are all functioning properly.
Can You Stop Rot in Roof Fascia and Soffits?
Yes, but these areas are frequently affected by gutter and roof problems that must be corrected at the same time.
Typical Causes
Common causes include:
- Overflowing gutters
- Ice dams in colder climates
- Missing drip edges
- Roof leaks
- Poor attic ventilation
Repair and Prevention
To stop the damage from returning:
- Replace compromised boards
- Improve roof drainage
- Install drip edge flashing
- Keep gutters clean
- Inspect the roof regularly
These components are critical because they protect the roof framing and help ventilate the attic.
How Can You Prevent Wood Rot from Returning?
Long-term prevention is just as important as the repair itself. Even a perfectly executed patch can fail if moisture is allowed to accumulate again.
Protect your home by making these tasks part of your maintenance routine:
- Inspect wood surfaces every season
- Repaint exposed wood as needed
- Replace cracked caulk promptly
- Clean gutters and downspouts
- Trim vegetation away from walls
- Maintain proper grading around the home
- Seal exterior wood regularly
- Improve airflow in enclosed spaces
Consistent maintenance dramatically reduces the chance of future decay.
Which Products Work Best?
Using high-quality materials increases the durability and appearance of your repair. The most useful supplies include:
- Wood hardeners
- Two-part epoxy fillers
- Exterior bonding primers
- Waterproof caulk
- Moisture meters
- Paintable sealants
When shopping, read labels carefully to ensure each product is suitable for exterior use and compatible with the repair method you plan to use.
Can You Repair Wood Rot Yourself?
Many wood rot repairs are manageable for homeowners with basic tools and patience. Small areas of trim, sills, and decorative woodwork are ideal DIY projects.
Good DIY Candidates
Homeowners can often handle repairs on:
- Window sills
- Door trim
- Deck boards
- Fence rails
- Decorative molding
When to Hire a Professional
Professional assistance is recommended if:
- Rot affects structural beams
- Damage is widespread
- The source of moisture is difficult to identify
- Mold is present
- Roofing or framing repairs are required
- The affected area feels unsafe or unstable
A qualified contractor can uncover hidden damage and ensure that critical structural components are repaired correctly.
How Much Does It Cost to Fix Wood Rot?
Costs vary depending on the location and severity of the damage.
Typical DIY Costs
- Wood hardener: $10–$30
- Epoxy filler: $20–$60
- Sandpaper and tools: $10–$50
- Primer and paint: $30–$100
Professional Repair Costs
- Minor trim repair: $150–$500
- Window sill replacement: $300–$1,000
- Structural repairs: $1,500 and up
Early intervention is almost always the most economical option.
What Happens if You Ignore Wood Rot?
Untreated rot continues spreading as long as moisture remains present.
Possible consequences include:
- Structural weakening
- Water intrusion
- Mold growth
- Pest infestations
- Reduced home value
- Larger remodeling costs
What starts as a soft patch of trim can eventually compromise framing and finishes.
Seasonal Inspection Checklist
Use this checklist every spring and fall.
Exterior Inspection
- Check siding and trim
- Probe window sills
- Inspect decks and porches
- Look for peeling paint
- Clean gutters
Interior Inspection
- Inspect around plumbing
- Check basements and crawl spaces
- Monitor musty odors
- Test suspicious areas
Routine inspections catch problems while they are still manageable.
Frequently Asked Questions
Can Rot Stop on Its Own?
No. Fungal decay continues until moisture is eliminated and damaged wood is repaired or replaced.
Does Paint Prevent Rot?
Paint helps protect wood, but it cannot stop decay once moisture becomes trapped beneath the surface.
Can Pressure-Treated Wood Rot?
Yes. It resists decay longer than untreated lumber, but it is not immune.
How Long Does Repair Last?
A properly completed repair can last many years if the moisture source is permanently corrected.
Is Bleach Enough to Kill Rot?
No. Bleach may clean surface discoloration, but it does not restore damaged wood or address underlying moisture.
Final Thoughts
Learning how to stop wood rot after spotting the first warning signs can save you substantial time and money. Soft wood, peeling paint, discoloration, and musty odors are signals that should never be ignored.
The most effective approach is straightforward: identify the moisture source, remove damaged material, strengthen the remaining wood, rebuild the affected area, and protect it with durable coatings. Whether the problem appears on a deck board, window sill, or fascia board, early action prevents further deterioration.
With regular inspections and consistent maintenance, you can keep your home’s wood components strong, attractive, and protected for years to come.